Galaxy Shooter — Shield Strength

Greetings, and welcome to this special series of articles. In this series, the intention is to take a solid functional base game and add some extra features that (hopefully) make it just a little more special.
The base game we have here is called Galaxy Shooter. It’s a Galaga-style 2D shmup that I put together while going through the 2D Game Development course for GameDevHQ. It has a controllable player ship, enemies, powerups, sound effects, music, and more. It is, as stated above, a fully functional game that can already be played and enjoyed in its current state.
But let’s see what else we can make it do.
Already in the game is a powerup that provides the player with a shield. The shield, when picked up, presents visually on the player ship and allows the player to take a hit without losing a life. In this article, we are going to modify this powerup to allow the player to take multiple hits before the shield is lost. In addition to that, we are going to provide some visual indication of how many hits the shield has already taken.
How things work initially
As stated earlier, initially the shield feature has a visual representation, and is capable of absorbing a hit that would have otherwise damaged the player.
In terms of gameplay, the shield is represented by a boolean variable — either the shield is active or it is not. In the portion of the code that handles damage to the player (which can be caused by enemy fire or collisions), if the shield is active then it will be deactivated but the player will not take damage.
The shield is not active at start. It is activated by picking up a specific powerup (colliding with the shield powerup). If the shield is lost, it can be gained again by finding another powerup. If the shield is already active, picking up the powerup again effectively does nothing.
The visual representation is accomplished by having a separate sprite object for the shield and making this object a child of the player ship object. The shield object is then positioned and configured to look appropriate when moving with the player ship. During gameplay, the shield sprite is enabled or disabled in tandem with the shield’s in-game status.
The code for this is fairly simple. When a shield powerup is picked up, the method for activating the shield is triggered. This method sets the shield enabled variable to true and the shield sprite is set to be active.

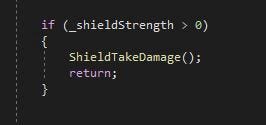
When the player is taking damage, the method that handles damage is triggered. At the start of that method is a section that checks if the shield is active, and if so it deactivates the shield but also returns out of the method, sparing the player any further damage.

Updating the gameplay
Changing the shield to take multiple hits is not a difficult process. It’s mostly just a matter of changing the shield status boolean variable to a shield strength integer variable. Then when the shield powerup is picked up, the shield strength is set to the specified maximum value, and when the player takes damage the shield strength is decremented.

We can see that the shield activation code is almost exactly the same as it was before. The max strength is set to 3 here.
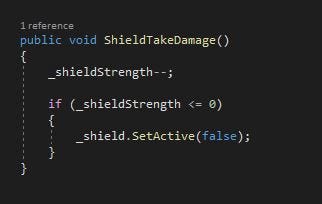
For the damage part of the code, since the shield is now taking damage instead of simply being on/off, I decided to separate damage to the shield into its own method.
Then within the new method, first the strength variable is decremented then it checks whether the strength has dropped to zero. If it has, the shield visuals are disabled.
That handles the gameplay, but we also want to show the player how strong their shield is at any point.
Creating a visual indicator for the player
There are any number of ways we can show the player how strong the shield is. We could have a number or meter in the UI, or we could somehow change the appearance of the shield itself.
My approach was to change the appearance of the shield. If we look at the Sprite Renderer, we can see that sprites have a Color field that is white by default. Even though sprites have colors of their own, this Color field allows us to change the appearance of the sprite.
The shield is a light blue by default, so we could have the color change from that to yellow to red to disabled as the strength drops. Or alternatively, another aspect of color is the alpha value, which represents the opacity of the color. If we drop the alpha value, the shield sprite will become more transparent and appear “weaker”. This is the approach I took.
For this we just need to adjust the alpha value of the sprite. To do this, we first need to access the object’s renderer, then update the value of the color.

This code gets its own method because it will need to be called both when the player takes damage and when the player picks up a new shield powerup. The shield strength value is used to determine what the alpha value should be. If the max shield strength was something other than 3, we would want to also adjust the value by which the alpha changes.

Now we have the shield coming into being when the player gets the powerup, and then getting visibly weaker as the player takes damage. Success!
But I’m not quite satisfied yet. It just doesn’t look very smooth to me right now. Can we improve on this?
Improving on what we have
What I would like to have here is for the shield to intensify or fade over time during a change, rather than abruptly change as it does. Is there a way we can have a value change over time?
That’s right, coroutines can do this for us. So let’s now adjust our appearance change code to make use of coroutines.
We will just completely discard the previous method in favor of this new coroutine. In the coroutine, we will want to change the sprite’s alpha values in incremental steps to get to the final target value.

The tricky part to this is since we are making incremental changes we need to know whether we are in the process of increasing or decreasing the shield’s strength. This is where the coroutine’s parameter comes in. When the powerup is gained the parameter will be true and when the player takes damage the parameter will be false.
From there, we have a target for our sprite’s alpha value, which is determined in the same way as our previous appearance change method. We also have a variable step for how large we want our alpha to change by in each pass of the loop.

And here is the result. I’m pretty pleased with it! What do you think?
In the next article, we’re going to make some adjustments to the player’s weapon. More specifically, we’re going to limit them so that the player cannot afford to fire wildly. Until then, good luck and happy coding!